<?xml version="1.0" encoding="utf-8"?><feed xmlns="http://www.w3.org/2005/Atom" ><generator uri="https://jekyllrb.com/" version="4.3.4">Jekyll</generator><link href="https://jonpalmisc.com/feed.xml" rel="self" type="application/atom+xml" /><link href="https://jonpalmisc.com/" rel="alternate" type="text/html" /><updated>2025-07-06T12:58:36+00:00</updated><id>https://jonpalmisc.com/feed.xml</id><title type="html">Jon Palmisciano</title><entry><title type="html">The Beheading of Madame de Maintenon</title><link href="https://jonpalmisc.com/2024/07/18/the-beheading-of-madame-de-maintenon.html" rel="alternate" type="text/html" title="The Beheading of Madame de Maintenon" /><published>2024-07-18T10:00:00+00:00</published><updated>2024-07-18T10:00:00+00:00</updated><id>https://jonpalmisc.com/2024/07/18/the-beheading-of-madame-de-maintenon</id><content type="html" xml:base="https://jonpalmisc.com/2024/07/18/the-beheading-of-madame-de-maintenon.html"><![CDATA[<p>I recently gave a talk titled “The Beheading of Madame de Maintenon” at
<a href="https://0x41con.org">0x41con</a> 2024. You can find the slides
<a href="/assets/slides/0x41con-2024-TheBeheadingOfMadameDeMaintenon.PUBLIC.pdf">here</a>.</p>]]></content><author><name>Jon Palmisciano</name></author><summary type="html"><![CDATA[I recently gave a talk titled “The Beheading of Madame de Maintenon” at 0x41con 2024. You can find the slides here.]]></summary></entry><entry><title type="html">The Suspiciously-Good UI of BIAS FX 2</title><link href="https://jonpalmisc.com/2023/10/16/bias-fx-2-ui.html" rel="alternate" type="text/html" title="The Suspiciously-Good UI of BIAS FX 2" /><published>2023-10-16T10:00:00+00:00</published><updated>2023-10-16T10:00:00+00:00</updated><id>https://jonpalmisc.com/2023/10/16/bias-fx-2-ui</id><content type="html" xml:base="https://jonpalmisc.com/2023/10/16/bias-fx-2-ui.html"><![CDATA[<p>When trying out different guitar rig plugins, I came across <a href="https://www.positivegrid.com/products/bias-fx-2">BIAS FX
2</a>. I liked the tones I could
create with it, but this writeup actually isn’t about that. One thing that really
impressed me was the quality of the plugin’s UI.</p>

<p><img src="/assets/img/bias-fx/ui.png" alt="BIAS FX's UI" /></p>

<p>
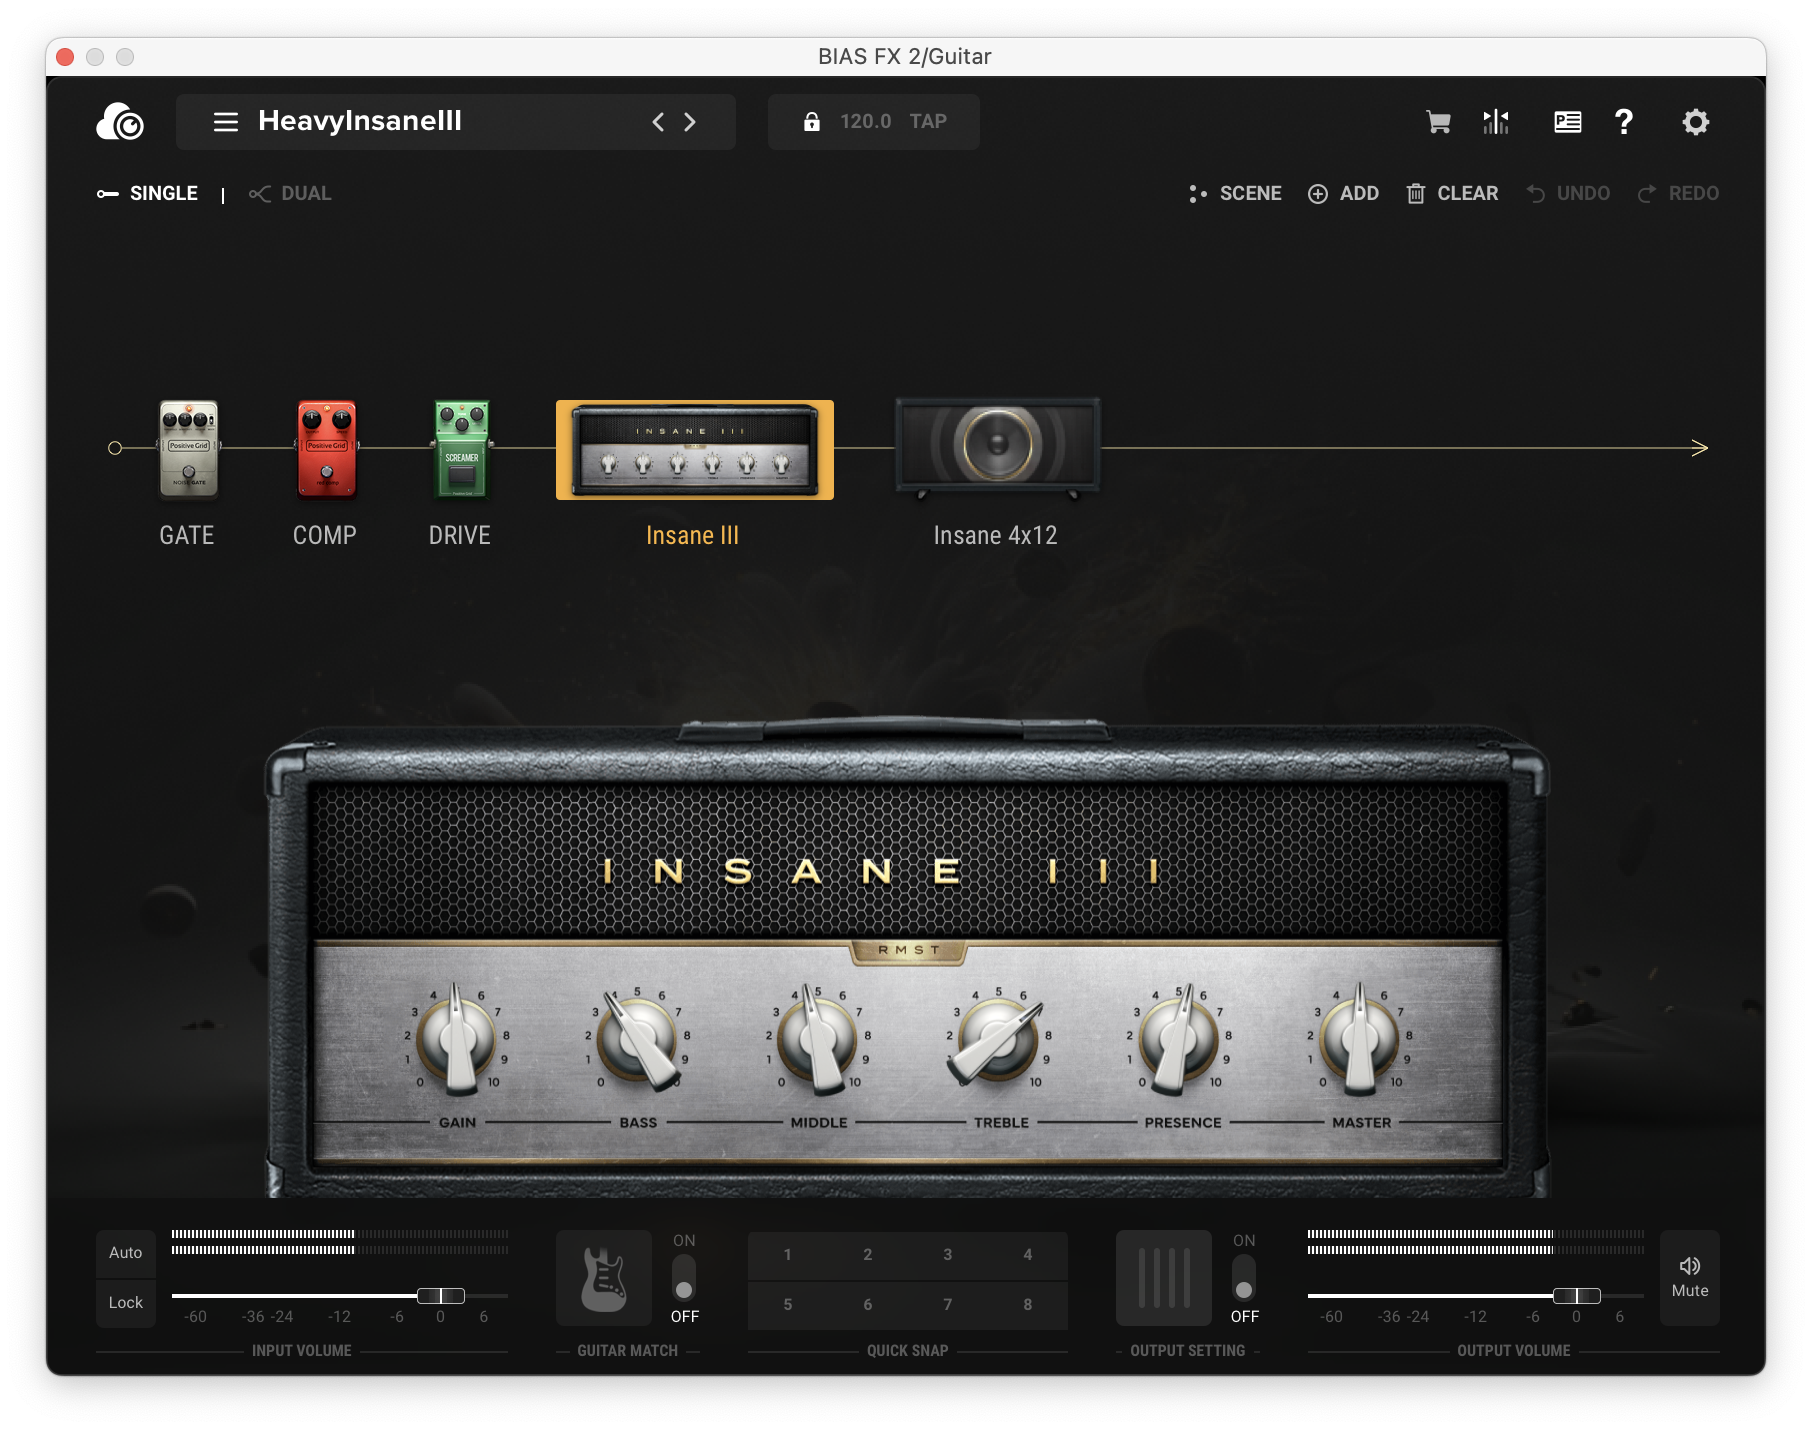
Most audio plugin UIs have always been a step behind other modern UIs. This
isn’t completely surprising; the popular UI frameworks for audio plugins are
either primitive in their styling options, or require lots of effort to make
look good. Knowing this, I was very impressed by how pleasant BIAS FX’s UI was;
the animations were smooth, theming was consistent, and things like
drag-and-drop felt perfectly natural. I was curious how they pulled it off.</p>

<h2 id="too-good-to-be-true">Too good to be true</h2>

<p>As it would turn out, the answer wasn’t some magical, proprietary UI framework:
it was HTML and CSS. This isn’t surprising in 2023—even decades-old apps like
Photoshop now have portions of their UI that are just embedded web views.
However, I’ve never seen this strategy used in an audio plugin before. I’m not
certain BIAS FX is the first to do this, but it’s the first I’ve come across,
which made it interesting to me.</p>

<p><img src="/assets/img/bias-fx/meme.png" alt="You wouldn't put a web browser in a VST plugin meme" /></p>

<p>Surprisingly, rather than effectively shipping a copy of Chromium, the
platform-native browser engine is used to drive the web view (at least on
macOS). This keeps installation size down, and as a bonus, yields a smoother
experience given how well-optimized WebKit is for Apple hardware/platforms.</p>

<h2 id="nothing-to-see-here">Nothing to see here</h2>

<p>Knowing the UI is really just a website explains a lot about about its
fidelity; as such, my focus shifted to peeking at the website sources and
assets directly. Looking through the plugin’s resources directory reveals no
shortage of HTML/CSS/JS files. Some of these look normal, but others (such as
<code class="language-plaintext highlighter-rouge">index.html</code>) look more like this:</p>

<div class="language-plaintext highlighter-rouge"><div class="highlight"><pre class="highlight"><code>$ xxd index.html | head -n 10
00000000: 5047 3030 3030 3030 2d30 3030 302d 3030  PG000000-0000-00
00000010: 3030 2d30 3030 302d 3030 3030 3030 3030  00-0000-00000000
00000020: 3030 3031 0500 0000 3136 3830 37c5 0200  0001....16807...
00000030: 0017 763a f864 b48c c5be 2e3e 7932 4642  ..v:.d.....&gt;y2FB
00000040: 5798 5198 32a2 d78f 2c0b 868b 60b2 d93e  W.Q.2...,...`..&gt;
00000050: 9815 9a38 2588 5a32 7dca a32a ca8b e55b  ...8%.Z2}..*...[
00000060: 71a7 9ef8 6856 9a10 f63d 8145 b56c 1af4  q...hV...=.E.l..
00000070: 5e86 0d57 44c1 70ac 325c c1cd 97e8 3536  ^..WD.p.2\....56
00000080: 9933 1fd7 5a0e 81dc f4a5 0135 ac76 c9cc  .3..Z......5.v..
00000090: f2d5 edf0 cdf4 500f 6c67 167e 6614 63c9  ......P.lg.~f.c.
</code></pre></div></div>

<p>Clearly these files are in some encoded format. Comparing a handful of these
encoded files visually shows they all share an apparent structure: a GUID
followed by “garbage”. The high entropy of these files suggests the “garbage”
is likely compressed or encrypted data:</p>

<div class="language-plaintext highlighter-rouge"><div class="highlight"><pre class="highlight"><code>$ rahash2 -a entropy index.html
index.html: 0x00000000-0x00000300 entropy: 7.66375743
</code></pre></div></div>

<h2 id="wtf-whats-the-format">WTF: What’s the format?</h2>

<p>Spoiler alert: it’s not compression. Some reversing of the plugin tells that
these files are a thin container over an encrypted payload. Represented as a C
type, the format looks like this:</p>

<div class="language-plaintext highlighter-rouge"><div class="highlight"><pre class="highlight"><code>struct EncodedFile __attribute((packed)) {
  int8_t magic_guid[36];          /* PG000000-0000-0000-0000-000000000001 */
	
  int32_t salt_len;               /* 0x5 */
  int8_t salt[salt_len];          /* 16807 */
	
  int32_t payload_len;            /* 0x2c5 */
  uint8_t payload[payload_len];   /* ... */
};
</code></pre></div></div>

<p>Every file begins with the magic GUID shown above. Since the plugin loads all
files through the same code path—and not all files are encrypted—this GUID
is used as a flag to indicate if the file needs decryption before its contents
are returned to the calling code.</p>

<p>Following the GUID is a 32-bit integer containing the length of the “salt”, a
numerical ASCII string used in deriving the encryption key for the file.
Finally, there is another 32-bit integer holding the length of the encrypted
payload, followed by the payload itself.</p>

<h2 id="encryption-begone">Encryption begone</h2>

<p>More reversing shows that the payload itself is encrypted using AES-256 in ECB
mode. Each file has a unique key derived from a constant “prefix” string and
the salt in the preamble. The steps for deriving the key are as follows:</p>

<div class="language-plaintext highlighter-rouge"><div class="highlight"><pre class="highlight"><code>  seed = Concatenate(salt_prefix, salt)
part_a = MD5(SHA1(seed))
part_b = SHA1(MD5(seed))
   key = Truncate(Concatenate(part_a, part_b), 32)
</code></pre></div></div>

<p>To summarize in English, the key is computed by:</p>

<ul>
  <li>concatenating the salt prefix and the salt to form the “seed”;</li>
  <li>running the seed through MD5 then SHA-1 (part A) and SHA-1 then MD5 (part B);</li>
  <li>concatenating A and B; and finally,</li>
  <li>truncating the result to 32 bytes.</li>
</ul>

<p>Not the most advanced protection, as you can see. That said, as to not lay out
everything in this post, finding the salt prefix is left as an exercise to the
reader; it’s not too difficult. :)</p>

<p>If you’re following along and want to check your work, the key for <code class="language-plaintext highlighter-rouge">index.html</code> is:</p>

<div class="language-plaintext highlighter-rouge"><div class="highlight"><pre class="highlight"><code>4b2e5b1df4854e717a0953d916dc653f047f33b72961235001a2233fbec5a611
</code></pre></div></div>

<p>and the SHA-1 sums of the encrypted and decrypted files are:</p>

<div class="language-plaintext highlighter-rouge"><div class="highlight"><pre class="highlight"><code>$ shasum index.html index.html.dec
3c49b8aa65bd24c376485bd6cf9da238367515c7  index.html
52c6ddf10ce91c84ed38e5be80e4377d58b2b90c  index.html.dec
</code></pre></div></div>

<p>All of this research was done on BIAS FX 2.6.1.6290 for macOS.</p>

<h2 id="debugging-without-lldb">Debugging (without LLDB)</h2>

<p>
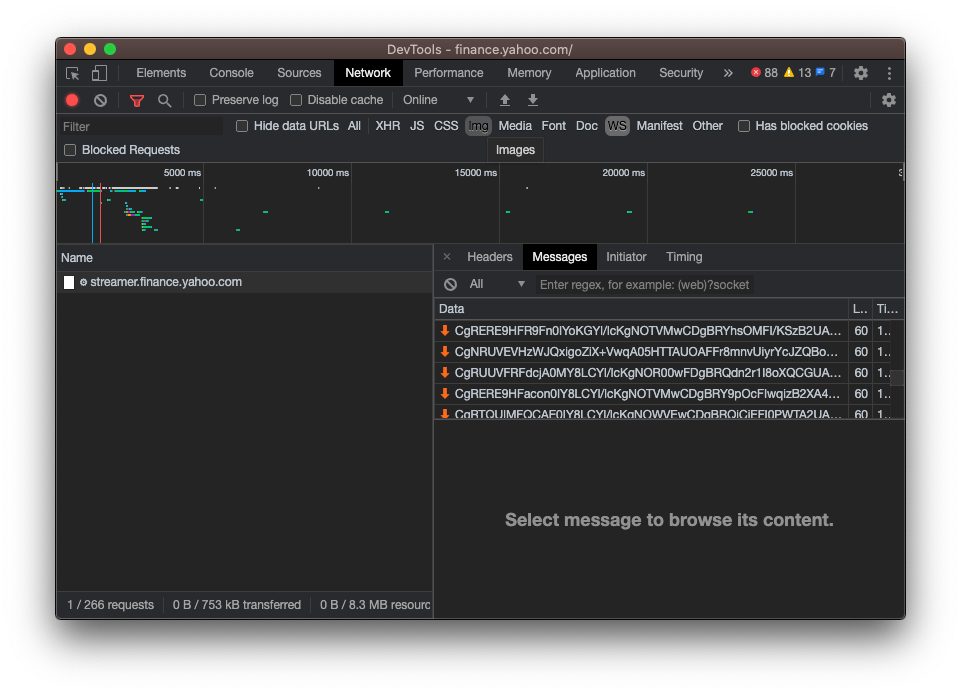
Since the UI is all web-based anyway, native debuggers (e.g. LLDB) are unlikely
to be of much help here for debugging the UI. However, a very important detail
was mentioned earlier: on macOS, the UI uses a native WebKit web view. This
means that like other native web views running on the system, it can be
debugged using Safari’s developer tools.</p>

<p><img src="/assets/img/bias-fx/inspector.png" alt="BIAS FX's UI in Safari's Web Inspector" /></p>

<p>Simply opening the “Develop” menu in Safari and looking in the submenu matching
your computer’s hostname will reveal all of the debuggable web views on the
system. If a BIAS FX plugin window is open, it will show up in the list.</p>

<h2 id="wrapping-up">Wrapping up</h2>

<p>This was a fun project, but wasn’t really started with any goal in particular
and as such, has no logical conclusion. There’s probably a lot more to be
explored with the web inspector, but I ran out of time to experiment further.</p>

<p>To conclude, I have a handful of final notes that didn’t really fit in anywhere
else in this writeup, but might be relevant for any future research:</p>

<ul>
  <li>JUCE is unsurprisingly used for the native parts of the plugin.</li>
  <li>The WebKit-based web view appears to be provided by or used in tandem with
JUCE’s web browser component.</li>
  <li>
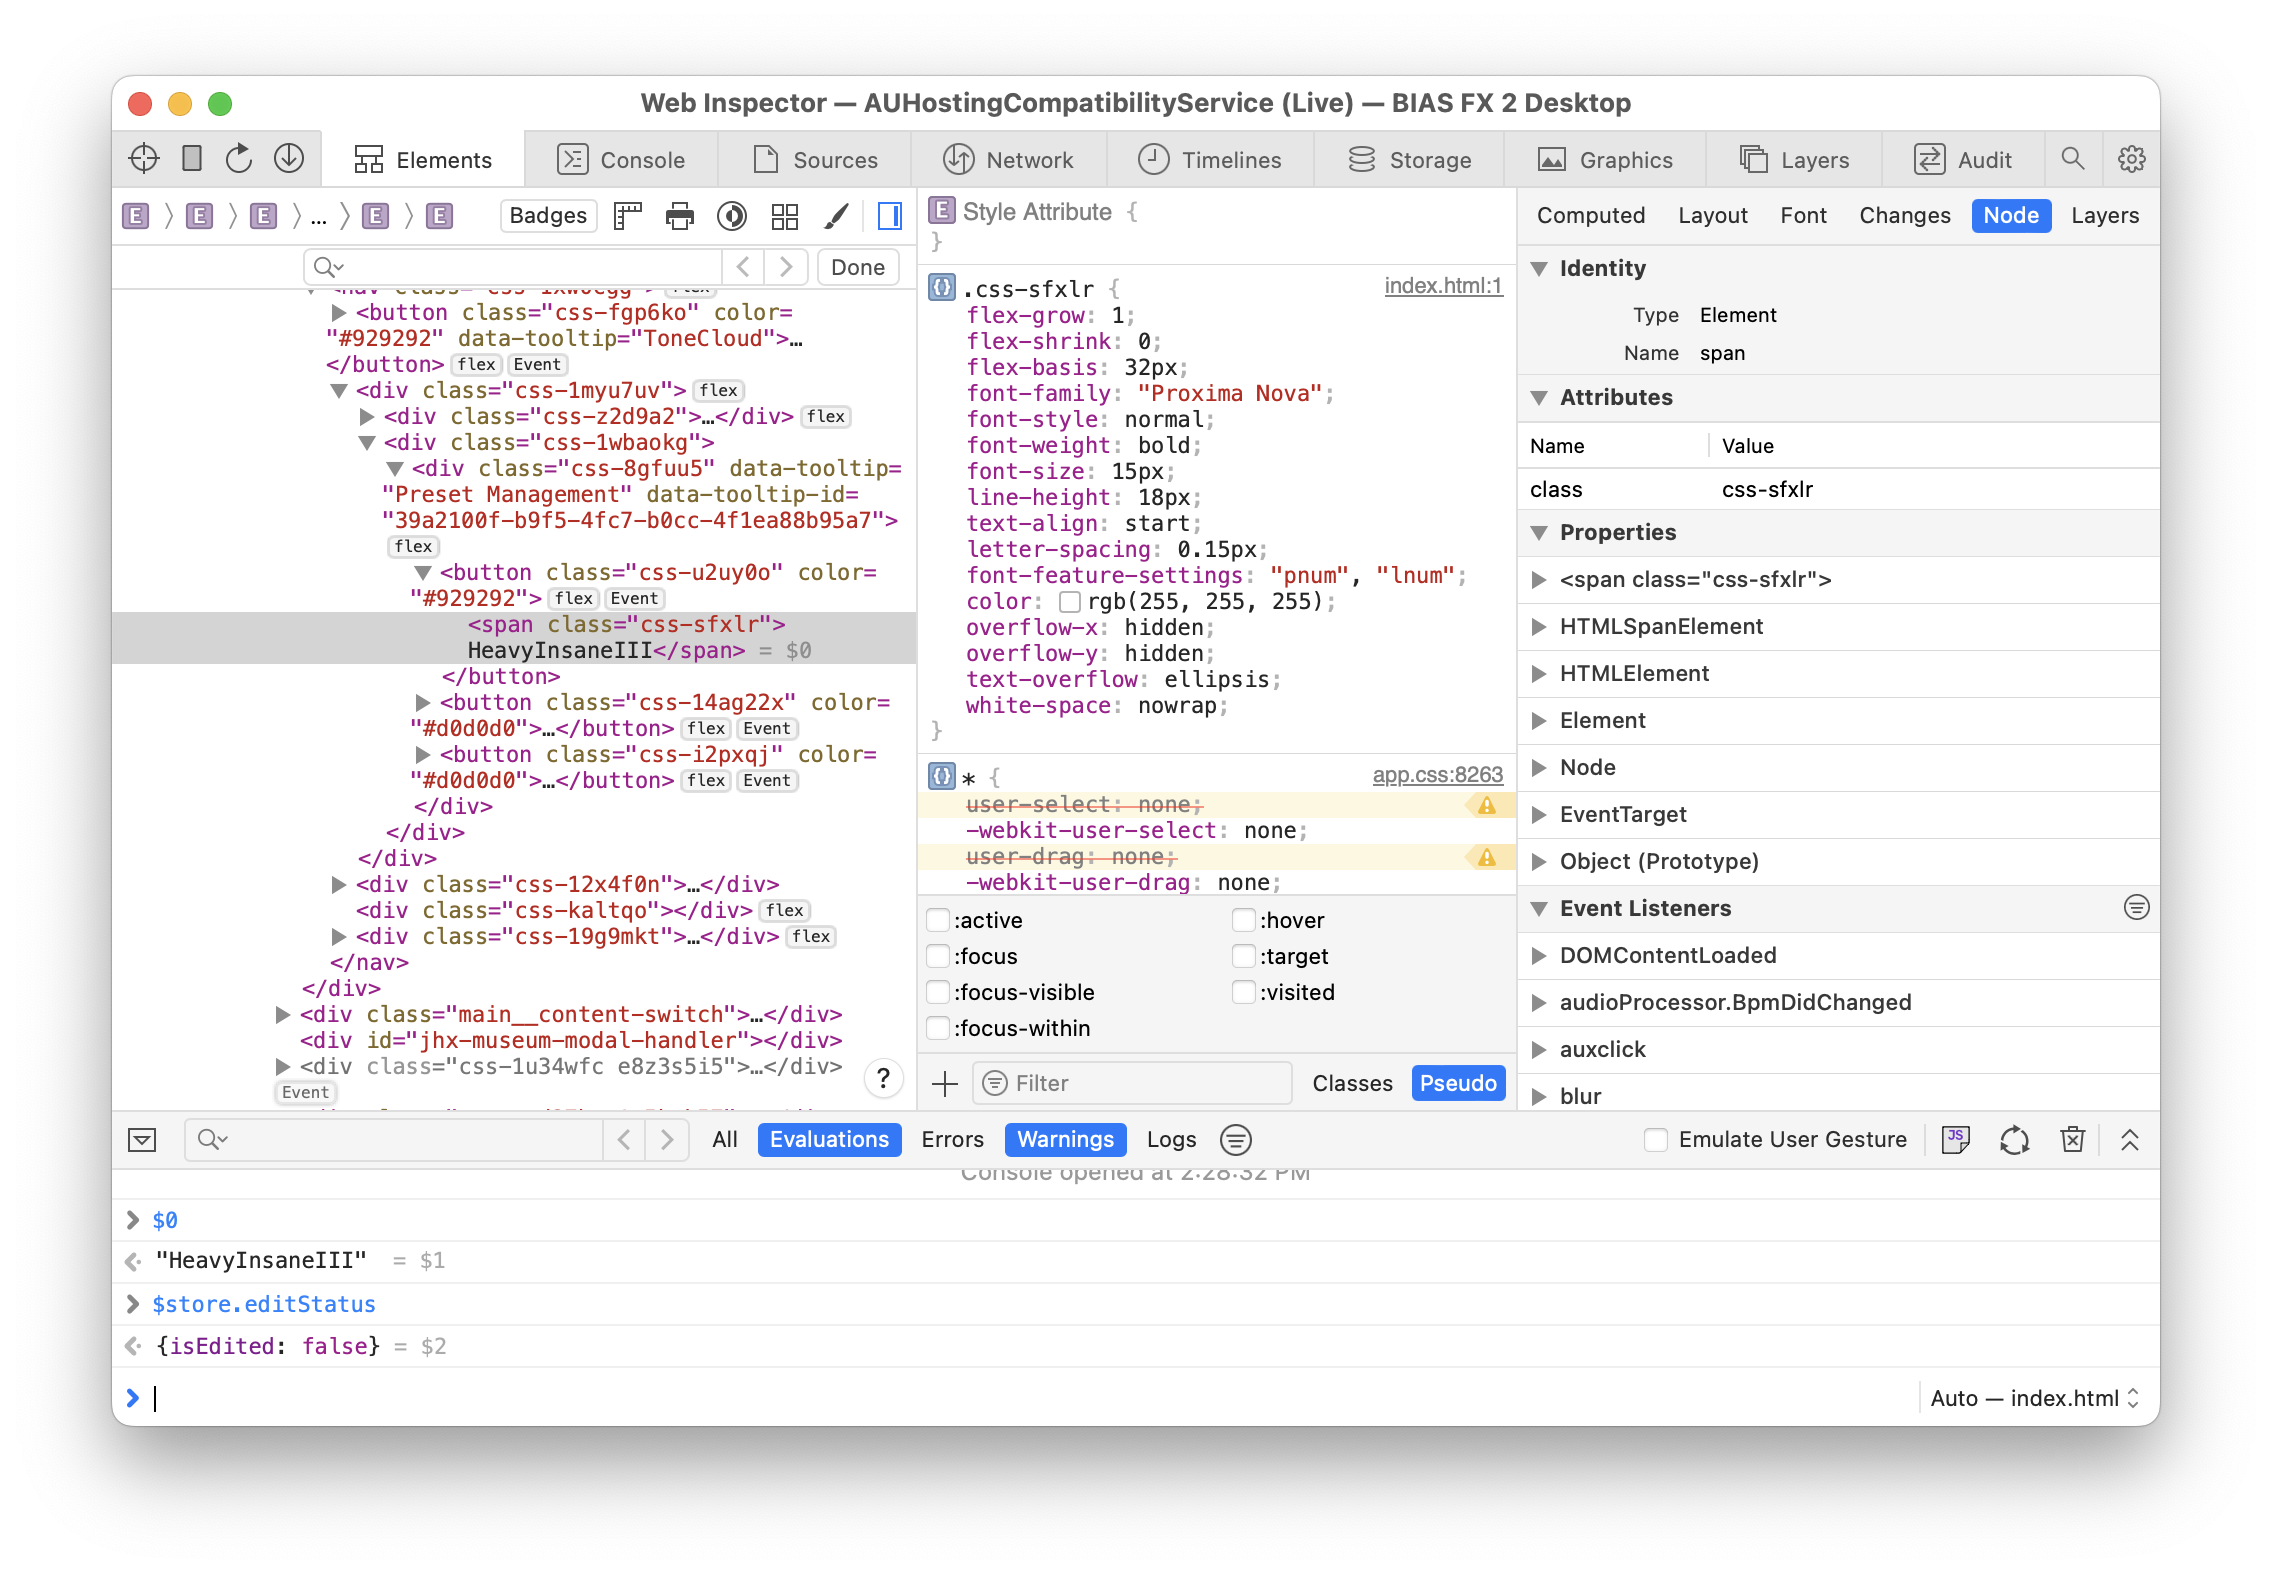
Attributes in the UI HTML suggest Angular is used in the UI.</li>
  <li>The plugin’s UI assets are copied to (and served out of) a temporary folder
on disk. I’m unsure what the benefit of this is.</li>
  <li>Assets remain encrypted on disk, which means they are decrypted in-transit
when loaded by the web view. This can be confirmed through more reversing,
but isn’t super interesting.</li>
  <li>The <code class="language-plaintext highlighter-rouge">$store</code> variable seems to hold a lot of plugin UI state; probably worth
fiddling with.</li>
  <li>The <code class="language-plaintext highlighter-rouge">Native</code> variable looks enticing and seemingly exposes communication to
the plugin’s backend, which is based on a system of “commands” whose handlers
&amp; registration can be seen in native code.</li>
</ul>

<p>As always, feel free to <a href="/contact">reach out</a> if you have any questions.</p>]]></content><author><name>Jon Palmisciano</name></author><summary type="html"><![CDATA[When trying out different guitar rig plugins, I came across BIAS FX 2. I liked the tones I could create with it, but this writeup actually isn’t about that. One thing that really impressed me was the quality of the plugin’s UI.]]></summary></entry><entry><title type="html">Get to Know Your Decompiler</title><link href="https://jonpalmisc.com/2023/07/31/get-to-know-your-decompiler.html" rel="alternate" type="text/html" title="Get to Know Your Decompiler" /><published>2023-07-31T10:00:00+00:00</published><updated>2023-07-31T10:00:00+00:00</updated><id>https://jonpalmisc.com/2023/07/31/get-to-know-your-decompiler</id><content type="html" xml:base="https://jonpalmisc.com/2023/07/31/get-to-know-your-decompiler.html"><![CDATA[<p>I recently gave a talk titled “Get to Know Your Decompiler” at
<a href="https://0x41con.org">0x41con</a> 2023. You can find the slides
<a href="/assets/slides/0x41con-2023-GetToKnowYourDecompiler.PUBLIC.pdf">here</a>.</p>

<p>The slides were designed to supplement my speaking (rather than doing the
talking for me), and per conference rules, there was no recording. That said,
you may still find them useful on their own. Feel free to <a href="/contact">contact</a>
me if you have any questions.</p>]]></content><author><name>Jon Palmisciano</name></author><summary type="html"><![CDATA[I recently gave a talk titled “Get to Know Your Decompiler” at 0x41con 2023. You can find the slides here.]]></summary></entry><entry><title type="html">Using CVE-2021-40531 for RCE with Sketch</title><link href="https://jonpalmisc.com/2021/11/22/cve-2021-40531.html" rel="alternate" type="text/html" title="Using CVE-2021-40531 for RCE with Sketch" /><published>2021-11-22T10:00:00+00:00</published><updated>2021-11-22T10:00:00+00:00</updated><id>https://jonpalmisc.com/2021/11/22/cve-2021-40531</id><content type="html" xml:base="https://jonpalmisc.com/2021/11/22/cve-2021-40531.html"><![CDATA[<p><a href="https://www.sketch.com">Sketch</a> is a popular UI/UX design app for macOS. This
post covers a vulnerability in Sketch that I discovered back in July —
CVE-2021-40531. In its simplest form, it is a macOS quarantine bypass, but in
context it can be used for remote code execution.</p>

<p><img src="/assets/img/cve-2021-40531/demo.gif" alt="Exploit Demo" /></p>

<p><em>The GIF above shows Calculator.app being opened by exploiting this
vulnerability. The source code for the proof-of-concept shown above is available
<a href="https://github.com/jonpalmisc/CVE-2021-40531">here</a>.</em></p>

<h2 id="library-feeds">Library feeds</h2>

<p>Sketch users can create collections of reusable design assets and share them
with other users; these collections are called “libraries”. To enable the
distribution and maintenance of libraries over the internet, Sketch utilizes
“library feeds”, which are just minimal RSS feeds that inform Sketch about a
library. Shown below is the feed for Apple’s official iOS 14 UI library, with
some unnecessary information trimmed for brevity.</p>

<div class="language-plaintext highlighter-rouge"><div class="highlight"><pre class="highlight"><code>&lt;?xml version="1.0" encoding="utf-8"?&gt;
&lt;rss&gt;
  &lt;channel&gt;
    &lt;title&gt;Apple iOS UI&lt;/title&gt;
    &lt;description&gt;Apple iOS 14 Sketch library&lt;/description&gt;
    &lt;language&gt;en&lt;/language&gt;
    &lt;item&gt;
      &lt;title&gt;Apple iOS UI&lt;/title&gt;
      &lt;sparkle:minimumSystemVersion&gt;70&lt;/sparkle:minimumSystemVersion&gt;
      &lt;sparkle:maximumSystemVersion&gt;71&lt;/sparkle:maximumSystemVersion&gt;
      &lt;pubDate&gt;Thu, 28 Jan 2021 9:00:00 +0000&lt;/pubDate&gt;
      &lt;enclosure url="https://...cdn.apple.com/.../library.dmg" ... /&gt;
    &lt;/item&gt;
  &lt;/channel&gt;
&lt;/rss&gt;
</code></pre></div></div>

<p>When installing or updating a library via a library feed, Sketch will
automatically download whatever is at the URL specified by the “enclosure” tag.
In the example shown above, the library’s content is distributed as a DMG
file.</p>

<h2 id="unrestricted-file-transfer">Unrestricted file transfer</h2>

<p>It turns out there are no restrictions on the type of URL that may be specified
in the enclosure tag — it doesn’t have to use HTTPS, or use any web protocol
at all. Given this lack of restrictions, it is possible to create a library
feed with any URL imaginable, pointing towards any type of content; Sketch will
happily download it.</p>

<h2 id="quarantine-bypass">Quarantine bypass</h2>

<p>Users of macOS are familiar with pop-up dialogs asking them to confirm they
would like to open a file downloaded from the internet. These prompts appear
because web browsers (among many other applications) mark files downloaded from
the internet with the “com.apple.quarantine” extended attribute; this signals
to macOS that the file should be treated with caution.</p>

<p>The key detail here is that this behavior is not automatic; applications must
explicitly mark downloaded files for quarantine. Prior to Sketch 75, files
downloaded as part of library feeds were <strong>not</strong> marked for quarantine.</p>

<h2 id="remote-code-execution">Remote code execution</h2>

<p>To recap so far, Sketch will download any type of file (from any URL) specified
in a library feed, and neglect to mark the downloaded file for quarantine. This behavior isn’t ideal, but also isn’t super interesting on its own.</p>

<p>However, I’ve left out one important detail — after Sketch downloads a file
from a library feed, that file will be automatically opened, <em>with no user
interaction at all.</em></p>

<p>Now things are more interesting. All of these behaviors combined provide a great
foundation for remote code execution — the only remaining task is finding a
file type that can be used to execute code when it is opened.</p>

<h3 id="terminal-profiles">Terminal profiles</h3>

<p>Surely there is no shortage of third-party applications suitable for this task,
but I wanted to find an application that ships with macOS that could be used.
The default terminal emulator on macOS (Terminal.app) supports saving
a “terminal profile” to a file, which looks something like this:</p>

<div class="language-plaintext highlighter-rouge"><div class="highlight"><pre class="highlight"><code>&lt;?xml version="1.0" encoding="UTF-8"?&gt;
&lt;!DOCTYPE plist PUBLIC "-//Apple//DTD PLIST 1.0//EN" "http://www.apple.com/DTDs/PropertyList-1.0.dtd"&gt;
&lt;plist version="1.0"&gt;
  &lt;dict&gt;
    &lt;key&gt;CommandString&lt;/key&gt;
    &lt;string&gt;open -a Calculator; killall Terminal&lt;/string&gt;
    &lt;key&gt;ProfileCurrentVersion&lt;/key&gt;
    &lt;real&gt;1.0&lt;/real&gt;
    &lt;key&gt;RunCommandAsShell&lt;/key&gt;
    &lt;false/&gt;
    &lt;key&gt;name&lt;/key&gt;
    &lt;string&gt;CVE-2021-40531&lt;/string&gt;
    &lt;key&gt;shellExitAction&lt;/key&gt;
    &lt;integer&gt;0&lt;/integer&gt;
    &lt;key&gt;type&lt;/key&gt;
    &lt;string&gt;Window Settings&lt;/string&gt;
    &lt;key&gt;warnOnShellCloseAction&lt;/key&gt;
    &lt;integer&gt;0&lt;/integer&gt;
  &lt;/dict&gt;
&lt;/plist&gt;
</code></pre></div></div>

<p>When a terminal profile is opened, it launches Terminal.app, creates a new
window using that profile, and runs the startup command specified in the
“CommandString” property. This makes terminal profiles a great choice for
achieving remote code execution in the context of this vulnerability.</p>

<p>It is important to note that if Sketch were properly quarantining downloaded
files, the terminal profile would not be able to open and execute code without
confirmation. Even with proper quarantining, some users might just click “Run”
anyway, but that’s a separate problem out of scope for this blog post. :)</p>

<h2 id="url-handler">URL handler</h2>

<p>To make installing libraries (or delivering this exploit) even easier, Sketch
registers a URL handler that accepts links in the following form:</p>

<div class="language-plaintext highlighter-rouge"><div class="highlight"><pre class="highlight"><code>sketch://add-library?url=&lt;LIBRARY_FEED_URL&gt;
</code></pre></div></div>

<p>This makes it possible to install a Sketch library feed by simply clicking a
link. In fact, Apple uses this strategy to provide access to their official
Sketch libraries. While using the URL handler is not necessary for exploiting
this vulnerability, it makes it even easier; potentially securing remote code
execution on the victim’s machine with just one click.</p>

<h2 id="proof-of-concept">Proof of concept</h2>

<p>A small proof-of-concept which opens Calculator.app by exploiting this
vulnerability (shown at the top of the page) is available on my GitHub
<a href="https://github.com/jonpalmisc/CVE-2021-40531">here</a>.</p>

<h2 id="closing-notes">Closing notes</h2>

<p>Sketch 75 and beyond now appropriately quarantine files downloaded from library
feeds. If you aren’t using Sketch 75 or newer, you should avoid using any
untrusted library feeds and update as soon as possible.</p>

<p>Finally, I’d like to thank Sketch for their swift cooperation in fixing this
vulnerability and for providing a €1,250 reward for reporting this
vulnerability.</p>]]></content><author><name>Jon Palmisciano</name></author><summary type="html"><![CDATA[Sketch is a popular UI/UX design app for macOS. This post covers a vulnerability in Sketch that I discovered back in July — CVE-2021-40531. In its simplest form, it is a macOS quarantine bypass, but in context it can be used for remote code execution.]]></summary></entry><entry><title type="html">A Native Build of Emacs for macOS/ARM64</title><link href="https://jonpalmisc.com/2021/10/13/building-emacs.html" rel="alternate" type="text/html" title="A Native Build of Emacs for macOS/ARM64" /><published>2021-10-13T05:00:00+00:00</published><updated>2021-10-13T05:00:00+00:00</updated><id>https://jonpalmisc.com/2021/10/13/building-emacs</id><content type="html" xml:base="https://jonpalmisc.com/2021/10/13/building-emacs.html"><![CDATA[<p>I recently purchased one of the new MacBook Air models with the M1 chip, and I
wanted to try out a “fully native” build of Emacs — where “fully native”
means:</p>

<ul>
  <li>using Emacs 28’s native Elisp compilation; and</li>
  <li>compiled for ARM64 (rather than running under Rosetta).</li>
</ul>

<p>There are many different macOS Emacs “distributions” out there, and I wasn’t
sure which to choose so I opted to compile Emacs from source myself.</p>

<p>The rest of this post is primarily a guide for my future self, but I’ve
published it for anyone else interested in building Emacs from source on
macOS. I’m not super familiar with building Emacs from source — these are just
the steps that worked for me.</p>

<h2 id="prerequisites-and-dependencies">Prerequisites and dependencies</h2>

<p>Emacs has a handful of dependencies which can all be installed via
<a href="https://brew.sh">Homebrew</a> with the following command:</p>

<div class="language-sh highlighter-rouge"><div class="highlight"><pre class="highlight"><code>brew <span class="nb">install </span>autoconf texinfo gnutls jansson gcc libgccjit
</code></pre></div></div>

<p>Next, get the Emacs source code by cloning it from the GitHub mirror:</p>

<div class="language-sh highlighter-rouge"><div class="highlight"><pre class="highlight"><code>git clone https://github.com/emacs-mirror/emacs.git <span class="nt">--branch</span> emacs-28 <span class="nt">--depth</span> 1
</code></pre></div></div>

<p>Depending on how far in the future you are reading this, the specific branch to
use will likely have changed. However, never forget to specify <code class="language-plaintext highlighter-rouge">--depth 1</code> as it
reduces the download size and speeds up the clone operation tremendously.</p>

<h2 id="building-and-waiting">Building (and waiting)</h2>

<p>This is the important part. Start by running <code class="language-plaintext highlighter-rouge">autogen.sh</code> to generate the
appropriate configuration utility, then invoke it as follows:</p>

<div class="language-sh highlighter-rouge"><div class="highlight"><pre class="highlight"><code><span class="nv">CFLAGS</span><span class="o">=</span><span class="s2">"-I</span><span class="si">$(</span>brew <span class="nt">--prefix</span> libgccjit<span class="si">)</span><span class="s2">/include -I</span><span class="si">$(</span>brew <span class="nt">--prefix</span> gcc<span class="si">)</span><span class="s2">/include"</span>
<span class="nv">LDFLAGS</span><span class="o">=</span><span class="s2">"</span><span class="nv">$CFLAGS</span><span class="s2"> -L</span><span class="si">$(</span>brew <span class="nt">--prefix</span> gcc<span class="si">)</span><span class="s2">/lib/gcc/11"</span>
<span class="nv">CFLAGS</span><span class="o">=</span><span class="s2">"</span><span class="nv">$CFLAGS</span><span class="s2"> -O2"</span>

./configure <span class="nt">--disable-silent-rules</span> <span class="nt">--with-xml2</span> <span class="nt">--with-gnutls</span> <span class="se">\</span>
	<span class="nt">--with-native-compilation</span> <span class="nt">--with-json</span> <span class="nt">--with-modules</span> <span class="nt">--with-ns</span> <span class="se">\</span>
	<span class="nt">--without-mailutils</span> <span class="nt">--without-dbus</span> <span class="nt">--without-imagemagick</span> <span class="nt">--without-rsvg</span> <span class="se">\</span>
	<span class="nt">--without-xpm</span> <span class="nt">--without-tiff</span> <span class="nt">--without-gif</span> <span class="nt">--without-lcms2</span> <span class="se">\</span>
	<span class="nt">--without-libsystemd</span> <span class="nt">--without-cairo</span> <span class="nt">--without-imagemagick</span> <span class="se">\</span>
	<span class="nt">--without-toolkit-scroll-bars</span>
</code></pre></div></div>

<p><em>Note: The GCC major version is hardcoded here and will need to be adjusted in
the future.</em></p>

<p>You may want to adjust the feature set and compiler flags as you see fit. Once
<code class="language-plaintext highlighter-rouge">configure</code> is done running, the rest of the build is rather easy:</p>

<div class="language-sh highlighter-rouge"><div class="highlight"><pre class="highlight"><code>make <span class="nt">-j8</span>
make <span class="nb">install</span>
</code></pre></div></div>

<p>Assuming all goes well, you should be greeted with a nice “fully-native” Emacs
application bundle located in the “nextstep” directory of the Emacs source tree.</p>]]></content><author><name>Jon Palmisciano</name></author><summary type="html"><![CDATA[I recently purchased one of the new MacBook Air models with the M1 chip, and I wanted to try out a “fully native” build of Emacs — where “fully native” means:]]></summary></entry><entry><title type="html">Creating Great Themes for Binary Ninja</title><link href="https://jonpalmisc.com/2021/07/08/creating-great-themes.html" rel="alternate" type="text/html" title="Creating Great Themes for Binary Ninja" /><published>2021-07-08T12:00:00+00:00</published><updated>2021-07-08T12:00:00+00:00</updated><id>https://jonpalmisc.com/2021/07/08/creating-great-themes</id><content type="html" xml:base="https://jonpalmisc.com/2021/07/08/creating-great-themes.html"><![CDATA[<p>This is a cross-post to the post I wrote on the official Binary Ninja Blog
during my summer internship at Vector 35. You can find the full article below:</p>

<p><a href="https://binary.ninja/2021/07/08/creating-great-themes.html">https://binary.ninja/2021/07/08/creating-great-themes.html</a></p>]]></content><author><name>Jon Palmisciano</name></author><summary type="html"><![CDATA[This is a cross-post to the post I wrote on the official Binary Ninja Blog during my summer internship at Vector 35. You can find the full article below:]]></summary></entry><entry><title type="html">Public Keys, Pirates, and You</title><link href="https://jonpalmisc.com/2021/04/26/embedding-public-keys.html" rel="alternate" type="text/html" title="Public Keys, Pirates, and You" /><published>2021-04-26T12:00:00+00:00</published><updated>2021-04-26T12:00:00+00:00</updated><id>https://jonpalmisc.com/2021/04/26/embedding-public-keys</id><content type="html" xml:base="https://jonpalmisc.com/2021/04/26/embedding-public-keys.html"><![CDATA[<p><a href="https://en.wikipedia.org/wiki/Public-key_cryptography">Public key cryptography</a>
is frequently used by copy protection schemes in commercial software. As a user,
it is common to be asked for a license file after installing new (paid)
software. This file often contains information about your purchase, such as the
product(s) you are authorized to run.</p>

<p>To prevent users from tampering with these files, a signature of the relevant
data is often included so the software can verify the license file:</p>

<ol>
  <li>has not been tampered with; and</li>
  <li>was truly created by the software vendor.</li>
</ol>

<p>While this is certainly better than using pattern-based serial numbers, it is
far from perfect.<sup id="fnref:1" role="doc-noteref"><a href="#fn:1" class="footnote" rel="footnote">1</a></sup> By itself, this strategy is vulnerable to a trivial attack
known as public key replacement.</p>

<h2 id="public-key-replacement">Public key replacement</h2>

<p>Public key replacement (PKR) occurs when an attacker replaces the public key
embedded in the software with their own. Simply put, this means that the
attacker can now pretend to be the vendor and sign their own license files.</p>

<p>An attacker will first reverse engineer the program to determine valid license
parameters. Next, they will generate a key pair matching the type found in the
software. They will then construct or generate an ideal license file, signed
with their private key. Finally, they will replace the public key found in the
binary with their own. Now, when the software runs, it will gladly accept the
illegitimate license.</p>

<p>What makes this such an attractive attack for pirates is that replacing the key
requires little effort. It is a simple find and replace operation. If there are
no other protections in place, once the public key has been swapped, additional
patching is usually not required.</p>

<p>In other words, disassembling and patching the program after each release isn’t
necessary. A one-time reverse engineering effort paired with a find-and-replace
Python script could turn into a reliable crack for years to come.</p>

<h2 id="key-reuse-and-recycling">Key reuse and recycling</h2>

<p>In many copy protection implementations, the key used to verify license
signatures is used for that purpose only. This means replacing it has no side
effects! Instead, try using the same signing key to also decrypt critical
application data, server responses, etc. where possible.</p>

<p>By doing this, replacing the key will cripple the rest of the app.<sup id="fnref:2" role="doc-noteref"><a href="#fn:2" class="footnote" rel="footnote">2</a></sup> If the
attacker wants to bypass this, they will need to decrypt all the relevant data
with the original key, then re-encrypt it to with their private key. If the data
comes from the network rather than the disk, this additional hurdle will be even
harder to bypass without a special proxy.</p>

<h2 id="key-integrity-checks">Key integrity checks</h2>

<p>Another strategy to make PKR more difficult is to check the integrity of the key
at runtime. An easy way to do this is to calculate the key’s checksum.</p>

<p>Hold on a moment, though. Don’t even think about including the checksum of the
key in the binary. That is just as easy to replace as the key itself!<sup id="fnref:3" role="doc-noteref"><a href="#fn:3" class="footnote" rel="footnote">3</a></sup>
Instead, compute the checksum at runtime and manually check individual bytes.
This will require patching to bypass, or a key whose checksum collides with the
real key at the points in question. Checking a sufficient amount of bytes can
reduce the odds of the latter to almost zero.</p>

<h2 id="wrapping-up">Wrapping up</h2>

<p>It’s important to remember that it is impossible to prevent your app from being
cracked. However, I think increasing the effort needed (especially aiming to
prevent automated patching) is always worthwhile. I like these strategies
because they aren’t very difficult to implement as a software vendor, but make
cracking your app a bit more annoying. :)</p>

<h2 id="appendix">Appendix</h2>

<div class="footnotes" role="doc-endnotes">
  <ol>
    <li id="fn:1" role="doc-endnote">
      <p>Windows XP (along with lots of other software at the time) used this strategy. For more on this, <a href="https://www.licenturion.com/xp/fully-licensed-wpa.txt">Fully Licensed’s paper</a> on Windows XP’s product activation is a good read. <a href="#fnref:1" class="reversefootnote" role="doc-backlink">&#8617;</a></p>
    </li>
    <li id="fn:2" role="doc-endnote">
      <p>Don’t bother with a revealing message about some error that will make tracking down this logic easier. Just let the software crash. After all, it’s not your customers who will encounter these issues. <a href="#fnref:2" class="reversefootnote" role="doc-backlink">&#8617;</a></p>
    </li>
    <li id="fn:3" role="doc-endnote">
      <p>You don’t want your copy protection to be defeated by a find and replace operation. However you choose to verify the key integrity, try to make sure the relevant code would need to be removed by hand. <a href="#fnref:3" class="reversefootnote" role="doc-backlink">&#8617;</a></p>
    </li>
  </ol>
</div>]]></content><author><name>Jon Palmisciano</name></author><summary type="html"><![CDATA[Public key cryptography is frequently used by copy protection schemes in commercial software. As a user, it is common to be asked for a license file after installing new (paid) software. This file often contains information about your purchase, such as the product(s) you are authorized to run.]]></summary></entry><entry><title type="html">Dynamic linker tricks you can try at home</title><link href="https://jonpalmisc.com/2020/09/01/dynamic-linker-fun.html" rel="alternate" type="text/html" title="Dynamic linker tricks you can try at home" /><published>2020-09-01T12:22:04+00:00</published><updated>2020-09-01T12:22:04+00:00</updated><id>https://jonpalmisc.com/2020/09/01/dynamic-linker-fun</id><content type="html" xml:base="https://jonpalmisc.com/2020/09/01/dynamic-linker-fun.html"><![CDATA[<p>The environment variables <code class="language-plaintext highlighter-rouge">DYLD_INSERT_LIBRARIES</code> (macOS) and <code class="language-plaintext highlighter-rouge">LD_PRELOAD</code>
(Linux) let you instruct the dynamic linker to load dynamic libraries that are
not normally part of an application.  Furthermore, the libraries specified are
loaded <em>before</em> any other libraries.  This technique, which I will hereafter
refer to as “library injection”, provides a lot of creative ways to modify and
exploit software.</p>

<h2 id="hijacking-dynamically-linked-functions">Hijacking dynamically linked functions</h2>

<p>First and foremost, library injection allows you to override the implementation
of dynamically linked functions. Sometimes larger (typically cross-platform)
applications extract most of their business logic into a separate library. This
extraction opens up an attack surface in which we can reimplement functions at
our convenience.</p>

<p>Assume we are targeting a commercial application with the intent of extending
the trial period by one week. From our analysis we know the application calls a
(dynamically-linked) function, <code class="language-plaintext highlighter-rouge">days_left</code>, to get the number of days left in
the trial. The code below shows how we can reimplement this function while also
preserving the implementation of the old one.</p>

<div class="language-c highlighter-rouge"><div class="highlight"><pre class="highlight"><code><span class="cp">#include</span> <span class="cpf">&lt;dlfcn.h&gt;</span><span class="cp">
#include</span> <span class="cpf">&lt;unistd.h&gt;</span><span class="cp">
</span>
<span class="kt">int</span> <span class="p">(</span><span class="o">*</span><span class="n">old_days_left</span><span class="p">)(</span><span class="kt">void</span><span class="p">)</span> <span class="o">=</span> <span class="nb">NULL</span><span class="p">;</span>

<span class="kt">int</span> <span class="nf">days_left</span><span class="p">(</span><span class="kt">void</span><span class="p">)</span> <span class="p">{</span>
  <span class="k">if</span> <span class="p">(</span><span class="o">!</span><span class="n">old_days_left</span><span class="p">)</span> <span class="p">{</span>
    <span class="n">old_days_left</span> <span class="o">=</span> <span class="n">dlsym</span><span class="p">(</span><span class="n">RTLD_NEXT</span><span class="p">,</span> <span class="s">"days_left"</span><span class="p">);</span>
  <span class="p">}</span>

  <span class="k">return</span> <span class="n">old_days_left</span><span class="p">()</span> <span class="o">+</span> <span class="mi">7</span><span class="p">;</span>
<span class="p">}</span>
</code></pre></div></div>

<p>Simply compile this code as a shared library and use the environment variables
mentioned earlier to load it. The steps to do this on macOS look like this:</p>

<div class="language-bash highlighter-rouge"><div class="highlight"><pre class="highlight"><code><span class="nv">$ </span>clang <span class="nt">-shared</span> extend.c <span class="nt">-o</span> libextend.dylib
<span class="nv">$ DYLD_INSERT_LIBRARIES</span><span class="o">=</span>./libextend.dylib ./example_application
</code></pre></div></div>

<p>When our library is injected into the application, our implementation will be
called instead, and we can enjoy a longer trial period.</p>

<p>See the man page for <code class="language-plaintext highlighter-rouge">dlsym</code> to better understand how the code above works. On
macOS you may need to use <code class="language-plaintext highlighter-rouge">DYLD_FORCE_FLAT_NAMESPACE=1</code> to ensure your
implementation is used, and I’ve heard you may need to disable System Integrity
Protection as well.</p>

<h2 id="persistent-injection-on-macos">Persistent injection on macOS</h2>

<p>Should we want to make our changes from the previous examples permanent, we
could replace the app’s main executable with a script which launches the
application with our library injected.</p>

<p>To do this, rename the main executable (you can just put an underscore in front
if it), and create an empty text file with the main executable’s old name. Open
the file in a text editor and add the following:</p>

<div class="language-bash highlighter-rouge"><div class="highlight"><pre class="highlight"><code><span class="c">#!/bin/sh</span>

<span class="nv">CONTENTS</span><span class="o">=</span><span class="si">$(</span><span class="nb">dirname</span> <span class="s2">"</span><span class="k">${</span><span class="nv">0</span><span class="k">}</span><span class="s2">"</span><span class="si">)</span>
<span class="nv">CONTENTS</span><span class="o">=</span><span class="si">$(</span><span class="nb">cd</span> <span class="s2">"</span><span class="k">${</span><span class="nv">CONTENTS</span><span class="k">}</span><span class="s2">/.."</span><span class="p">;</span> <span class="nb">pwd</span><span class="si">)</span>

<span class="c"># Here is where you would configure your injection. Copy your compiled library</span>
<span class="c"># to somewhere inside the app bundle, such as the Frameworks directory.</span>
<span class="nb">export </span><span class="nv">DYLD_INSERT_LIBRARIES</span><span class="o">=</span><span class="s2">"</span><span class="nv">$CONTENTS</span><span class="s2">/Frameworks/libextendedtrial.dylib"</span>

<span class="c"># If your application was called "HelloWorld", make that this script's name.</span>
<span class="s2">"</span><span class="nv">$CONTENTS</span><span class="s2">/MacOS/_HelloWorld"</span> <span class="s2">"</span><span class="nv">$@</span><span class="s2">"</span>
</code></pre></div></div>

<p>Finally, make the script executable with <code class="language-plaintext highlighter-rouge">chmod +x HelloWorld</code>. Now you should
be able to open the application normally, via the Dock, Spotlight, etc. and
your library will always be loaded. Note that some applications manually verify
their code signature, etc. and this method will not work in some of those
cases.</p>]]></content><author><name>Jon Palmisciano</name></author><summary type="html"><![CDATA[The environment variables DYLD_INSERT_LIBRARIES (macOS) and LD_PRELOAD (Linux) let you instruct the dynamic linker to load dynamic libraries that are not normally part of an application. Furthermore, the libraries specified are loaded before any other libraries. This technique, which I will hereafter refer to as “library injection”, provides a lot of creative ways to modify and exploit software.]]></summary></entry><entry><title type="html">How Yahoo Finance serves realtime data</title><link href="https://jonpalmisc.com/2020/08/10/yahoo-finance-websockets.html" rel="alternate" type="text/html" title="How Yahoo Finance serves realtime data" /><published>2020-08-10T16:08:43+00:00</published><updated>2020-08-10T16:08:43+00:00</updated><id>https://jonpalmisc.com/2020/08/10/yahoo-finance-websockets</id><content type="html" xml:base="https://jonpalmisc.com/2020/08/10/yahoo-finance-websockets.html"><![CDATA[<p>If you take a look at stock on Yahoo Finance during market hours, you will
notice the price and other key information updates in realtime:</p>

<p><img src="/assets/img/yahoo-finance-websockets/live.gif" alt="Live Data Demonstration" /></p>

<p>I was curious how this was done, so I started to investigate. The Chrome
developer tools confirmed my suspicion that these realtime updates are achieved
through the use of
<a href="https://developer.mozilla.org/en-US/docs/Web/API/WebSockets_API">WebSockets</a>.</p>

<p><img src="/assets/img/yahoo-finance-websockets/devtools-ws.png" alt="Developer Tools" /></p>

<p>When the page is first loaded, the client opens a WebSocket connection and
sends a subscribe request, which looks like the following:</p>

<div class="language-json highlighter-rouge"><div class="highlight"><pre class="highlight"><code><span class="p">{</span><span class="w">
  </span><span class="nl">"subscribe"</span><span class="p">:[</span><span class="w">
    </span><span class="s2">"^GSPC"</span><span class="p">,</span><span class="w">
    </span><span class="s2">"^DJI"</span><span class="p">,</span><span class="w">
    </span><span class="s2">"^IXIC"</span><span class="p">,</span><span class="w">
    </span><span class="s2">"^RUT"</span><span class="p">,</span><span class="w">
    </span><span class="s2">"AAPL"</span><span class="w">
  </span><span class="p">]</span><span class="w">
</span><span class="p">}</span><span class="w">
</span></code></pre></div></div>

<p>As you can see, the client just specifies a list of stock symbols to receive
updates for. The backend will then send new data to the client as it becomes
available, roughly every second. Here is a response from the server:</p>

<div class="language-plaintext highlighter-rouge"><div class="highlight"><pre class="highlight"><code>CgRBQVBMFZqZ4UMYoI+hlvlcKgNOTVMwCDgBRXIUSr9IyOXZDmWAwmXA2AEE
</code></pre></div></div>

<p>Looking at the response, it is easy to recognize it is Base64 encoded. But when
decoded, the data is not structured in any obvious format. Further inspection
of the Yahoo Finance site’s code reveals that these are actually
<a href="https://developers.google.com/protocol-buffers">Protobuf</a> messages.</p>

<div class="language-js highlighter-rouge"><div class="highlight"><pre class="highlight"><code><span class="nx">PricingData</span><span class="p">.</span><span class="nx">decode</span> <span class="o">=</span> <span class="kd">function</span> <span class="nf">decode</span><span class="p">(</span><span class="nx">r</span><span class="p">,</span> <span class="nx">l</span><span class="p">)</span> <span class="p">{</span>
  <span class="k">if </span><span class="p">(</span><span class="o">!</span><span class="p">(</span><span class="nx">r</span> <span class="k">instanceof</span> <span class="nx">$Reader</span><span class="p">))</span> <span class="nx">r</span> <span class="o">=</span> <span class="nx">$Reader</span><span class="p">.</span><span class="nf">create</span><span class="p">(</span><span class="nx">r</span><span class="p">);</span>
  <span class="kd">var</span> <span class="nx">c</span> <span class="o">=</span> <span class="nx">l</span> <span class="o">===</span> <span class="kc">undefined</span> <span class="p">?</span> <span class="nx">r</span><span class="p">.</span><span class="nx">len</span> <span class="p">:</span> <span class="nx">r</span><span class="p">.</span><span class="nx">pos</span> <span class="o">+</span> <span class="nx">l</span><span class="p">,</span>
    <span class="nx">m</span> <span class="o">=</span> <span class="k">new</span> <span class="nx">$root</span><span class="p">.</span><span class="nx">quotefeeder</span><span class="p">.</span><span class="nc">PricingData</span><span class="p">();</span>

  <span class="k">while </span><span class="p">(</span><span class="nx">r</span><span class="p">.</span><span class="nx">pos</span> <span class="o">&lt;</span> <span class="nx">c</span><span class="p">)</span> <span class="p">{</span>
    <span class="kd">var</span> <span class="nx">t</span> <span class="o">=</span> <span class="nx">r</span><span class="p">.</span><span class="nf">uint32</span><span class="p">();</span>
    <span class="k">switch </span><span class="p">(</span><span class="nx">t</span> <span class="o">&gt;&gt;&gt;</span> <span class="mi">3</span><span class="p">)</span> <span class="p">{</span>
      <span class="k">case</span> <span class="mi">1</span><span class="p">:</span>
        <span class="nx">m</span><span class="p">.</span><span class="nx">id</span> <span class="o">=</span> <span class="nx">r</span><span class="p">.</span><span class="nf">string</span><span class="p">();</span>
        <span class="k">break</span><span class="p">;</span>
      <span class="k">case</span> <span class="mi">2</span><span class="p">:</span>
        <span class="nx">m</span><span class="p">.</span><span class="nx">price</span> <span class="o">=</span> <span class="nx">r</span><span class="p">.</span><span class="nf">float</span><span class="p">();</span>
        <span class="k">break</span><span class="p">;</span>
      <span class="k">case</span> <span class="mi">3</span><span class="p">:</span>
        <span class="nx">m</span><span class="p">.</span><span class="nx">time</span> <span class="o">=</span> <span class="nx">r</span><span class="p">.</span><span class="nf">sint64</span><span class="p">();</span>
        <span class="k">break</span><span class="p">;</span>
      <span class="k">case</span> <span class="mi">4</span><span class="p">:</span>
        <span class="nx">m</span><span class="p">.</span><span class="nx">currency</span> <span class="o">=</span> <span class="nx">r</span><span class="p">.</span><span class="nf">string</span><span class="p">();</span>
        <span class="k">break</span><span class="p">;</span>

      <span class="c1">// Additional fields omitted for brevity...</span>
    <span class="p">}</span>
  <span class="p">}</span>

  <span class="k">return</span> <span class="nx">m</span><span class="p">;</span>
<span class="p">};</span>
</code></pre></div></div>

<p>Reverse engineering the decoding function (shown above) allows us to construct
a valid Protobuf message definition for the server’s responses:</p>

<div class="language-proto highlighter-rouge"><div class="highlight"><pre class="highlight"><code><span class="kd">message</span> <span class="nc">PricingData</span> <span class="p">{</span>
    <span class="kt">string</span> <span class="na">id</span> <span class="o">=</span> <span class="mi">1</span><span class="p">;</span>
    <span class="kt">float</span> <span class="na">price</span> <span class="o">=</span> <span class="mi">2</span><span class="p">;</span>
    <span class="kt">sint64</span> <span class="na">time</span> <span class="o">=</span> <span class="mi">3</span><span class="p">;</span>
    <span class="kt">string</span> <span class="na">currency</span> <span class="o">=</span> <span class="mi">4</span><span class="p">;</span>
    <span class="kt">string</span> <span class="na">exchange</span> <span class="o">=</span> <span class="mi">5</span><span class="p">;</span>
    <span class="kt">int32</span> <span class="na">quote_type</span> <span class="o">=</span> <span class="mi">6</span><span class="p">;</span>
    <span class="kt">int32</span> <span class="na">market_hours</span> <span class="o">=</span> <span class="mi">7</span><span class="p">;</span>
    <span class="kt">float</span> <span class="na">change_percent</span> <span class="o">=</span> <span class="mi">8</span><span class="p">;</span>
    <span class="kt">sint64</span> <span class="na">day_volume</span> <span class="o">=</span> <span class="mi">9</span><span class="p">;</span>
    <span class="kt">float</span> <span class="na">day_high</span> <span class="o">=</span> <span class="mi">10</span><span class="p">;</span>
    <span class="kt">float</span> <span class="na">day_low</span> <span class="o">=</span> <span class="mi">11</span><span class="p">;</span>
    <span class="kt">float</span> <span class="na">change</span> <span class="o">=</span> <span class="mi">12</span><span class="p">;</span>
    <span class="kt">string</span> <span class="na">short_name</span> <span class="o">=</span> <span class="mi">13</span><span class="p">;</span>
    <span class="kt">sint64</span> <span class="na">expire_date</span> <span class="o">=</span> <span class="mi">14</span><span class="p">;</span>
    <span class="kt">float</span> <span class="na">open_price</span> <span class="o">=</span> <span class="mi">15</span><span class="p">;</span>
    <span class="kt">float</span> <span class="na">previous_close</span> <span class="o">=</span> <span class="mi">16</span><span class="p">;</span>
    <span class="kt">float</span> <span class="na">strike_price</span> <span class="o">=</span> <span class="mi">17</span><span class="p">;</span>
    <span class="kt">string</span> <span class="na">underlying_symbol</span> <span class="o">=</span> <span class="mi">18</span><span class="p">;</span>
    <span class="kt">sint64</span> <span class="na">open_interest</span> <span class="o">=</span> <span class="mi">19</span><span class="p">;</span>
    <span class="kt">sint64</span> <span class="na">options_type</span> <span class="o">=</span> <span class="mi">20</span><span class="p">;</span>
    <span class="kt">sint64</span> <span class="na">mini_option</span> <span class="o">=</span> <span class="mi">21</span><span class="p">;</span>
    <span class="kt">sint64</span> <span class="na">last_size</span> <span class="o">=</span> <span class="mi">22</span><span class="p">;</span>
    <span class="kt">float</span> <span class="na">bid</span> <span class="o">=</span> <span class="mi">23</span><span class="p">;</span>
    <span class="kt">sint64</span> <span class="na">bid_size</span> <span class="o">=</span> <span class="mi">24</span><span class="p">;</span>
    <span class="kt">float</span> <span class="na">ask</span> <span class="o">=</span> <span class="mi">25</span><span class="p">;</span>
    <span class="kt">sint64</span> <span class="na">ask_size</span> <span class="o">=</span> <span class="mi">26</span><span class="p">;</span>
    <span class="kt">sint64</span> <span class="na">price_hint</span> <span class="o">=</span> <span class="mi">27</span><span class="p">;</span>
    <span class="kt">sint64</span> <span class="na">vol_24hr</span> <span class="o">=</span> <span class="mi">28</span><span class="p">;</span>
    <span class="kt">sint64</span> <span class="na">vol_all_currencies</span> <span class="o">=</span> <span class="mi">29</span><span class="p">;</span>
    <span class="kt">string</span> <span class="na">from_currency</span> <span class="o">=</span> <span class="mi">30</span><span class="p">;</span>
    <span class="kt">string</span> <span class="na">last_market</span> <span class="o">=</span> <span class="mi">31</span><span class="p">;</span>
    <span class="kt">double</span> <span class="na">circulating_supply</span> <span class="o">=</span> <span class="mi">32</span><span class="p">;</span>
    <span class="kt">double</span> <span class="na">market_cap</span> <span class="o">=</span> <span class="mi">33</span><span class="p">;</span>
<span class="p">}</span>
</code></pre></div></div>

<p>It is also worth noting that no authentication is required by the client to
connect and receive realtime data. This means you can (theoretically) use the
API in your own programs, as long as your language of choice is supported by
Protobuf and has a WebSockets library.</p>

<p>I do not believe this API is intended for public use, so I would exercise
caution when using it for your own purposes. Furthermore, despite the large
number of different fields defined, only a subset of them are regularly
streamed, specifically fields 1-3, 5-9, 12 and 27. You will need to fetch the
remaining data from a different source.</p>]]></content><author><name>Jon Palmisciano</name></author><summary type="html"><![CDATA[If you take a look at stock on Yahoo Finance during market hours, you will notice the price and other key information updates in realtime:]]></summary></entry></feed>